June Lake, California, October

June Lake, California.

June Lake, California.

I just got back from a week in the Eastern Sierras photographing mostly landscapes.  I thought I would relay a little tip for composing scenic photos, for your next excursion. 

Eastern Sierras at June Lake, October. 

Eastern Sierras at June Lake, October. 

In this shot you can see that I was using a wide angle lens and I incorporated some rocks in the foreground.  I always try to look for something to compose in the foreground so that those objects can lead the viewer into the frame.  While the mountains with the sunrise skimming across the top are the main focus of the image, the rocks add some texture to an otherwise mundane lake view. 

Composing the foreground with the reflections.

Composing the foreground with the reflections.

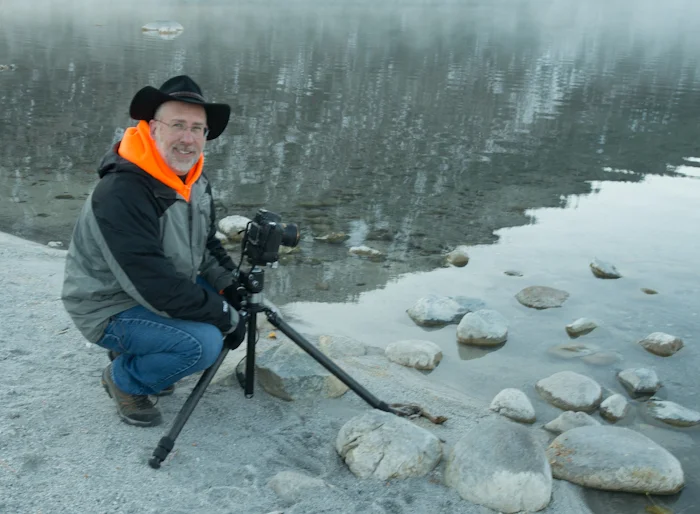
While I was setting up, and freezing because of not being prepared for 20 degree weather, I had a passer-by shoot the photo of me setting up.

Often when I'm setting up, other photographers will stop and ask me what I'm doing, what kind of lens or camera that I prefer.   This was do different, as a women walked by with a camera slung around her neck, asking questions.

After a few pleasantries, I asked her to take my photo with one of my other cameras.  She said, sure!  Almost flattered that I would ask.  

It took me a minute or two to take my long lens off my other camera and the woman watched me with great interest.  

When I handed her my camera and went to crouch down by my tripod, she became very curt, saying "Be quick about it!  I have things to do. Quickly now." 

What is that about?  She had all the time in the world when she was asking questions, but when it came to taking a quick shot for me, she became demanding.

This is a round about way for me to explain why the photo by me is slightly blurry, it wasn't shot by me.

Even in the panorama of the same scene, I chose to keep something in the foreground to provide some interest and to break up the reflections on the water. 


Even in this panorama, I try to include something like rocks to breakup the reflections and add some interest to the water. 

Even in this panorama, I try to include something like rocks to breakup the reflections and add some interest to the water. 

Panorama, June Lake

Panorama, June Lake

Moving Timelapse

Moving Timelapse

You know how to make a timelapse movie now, but how about one that moves? 

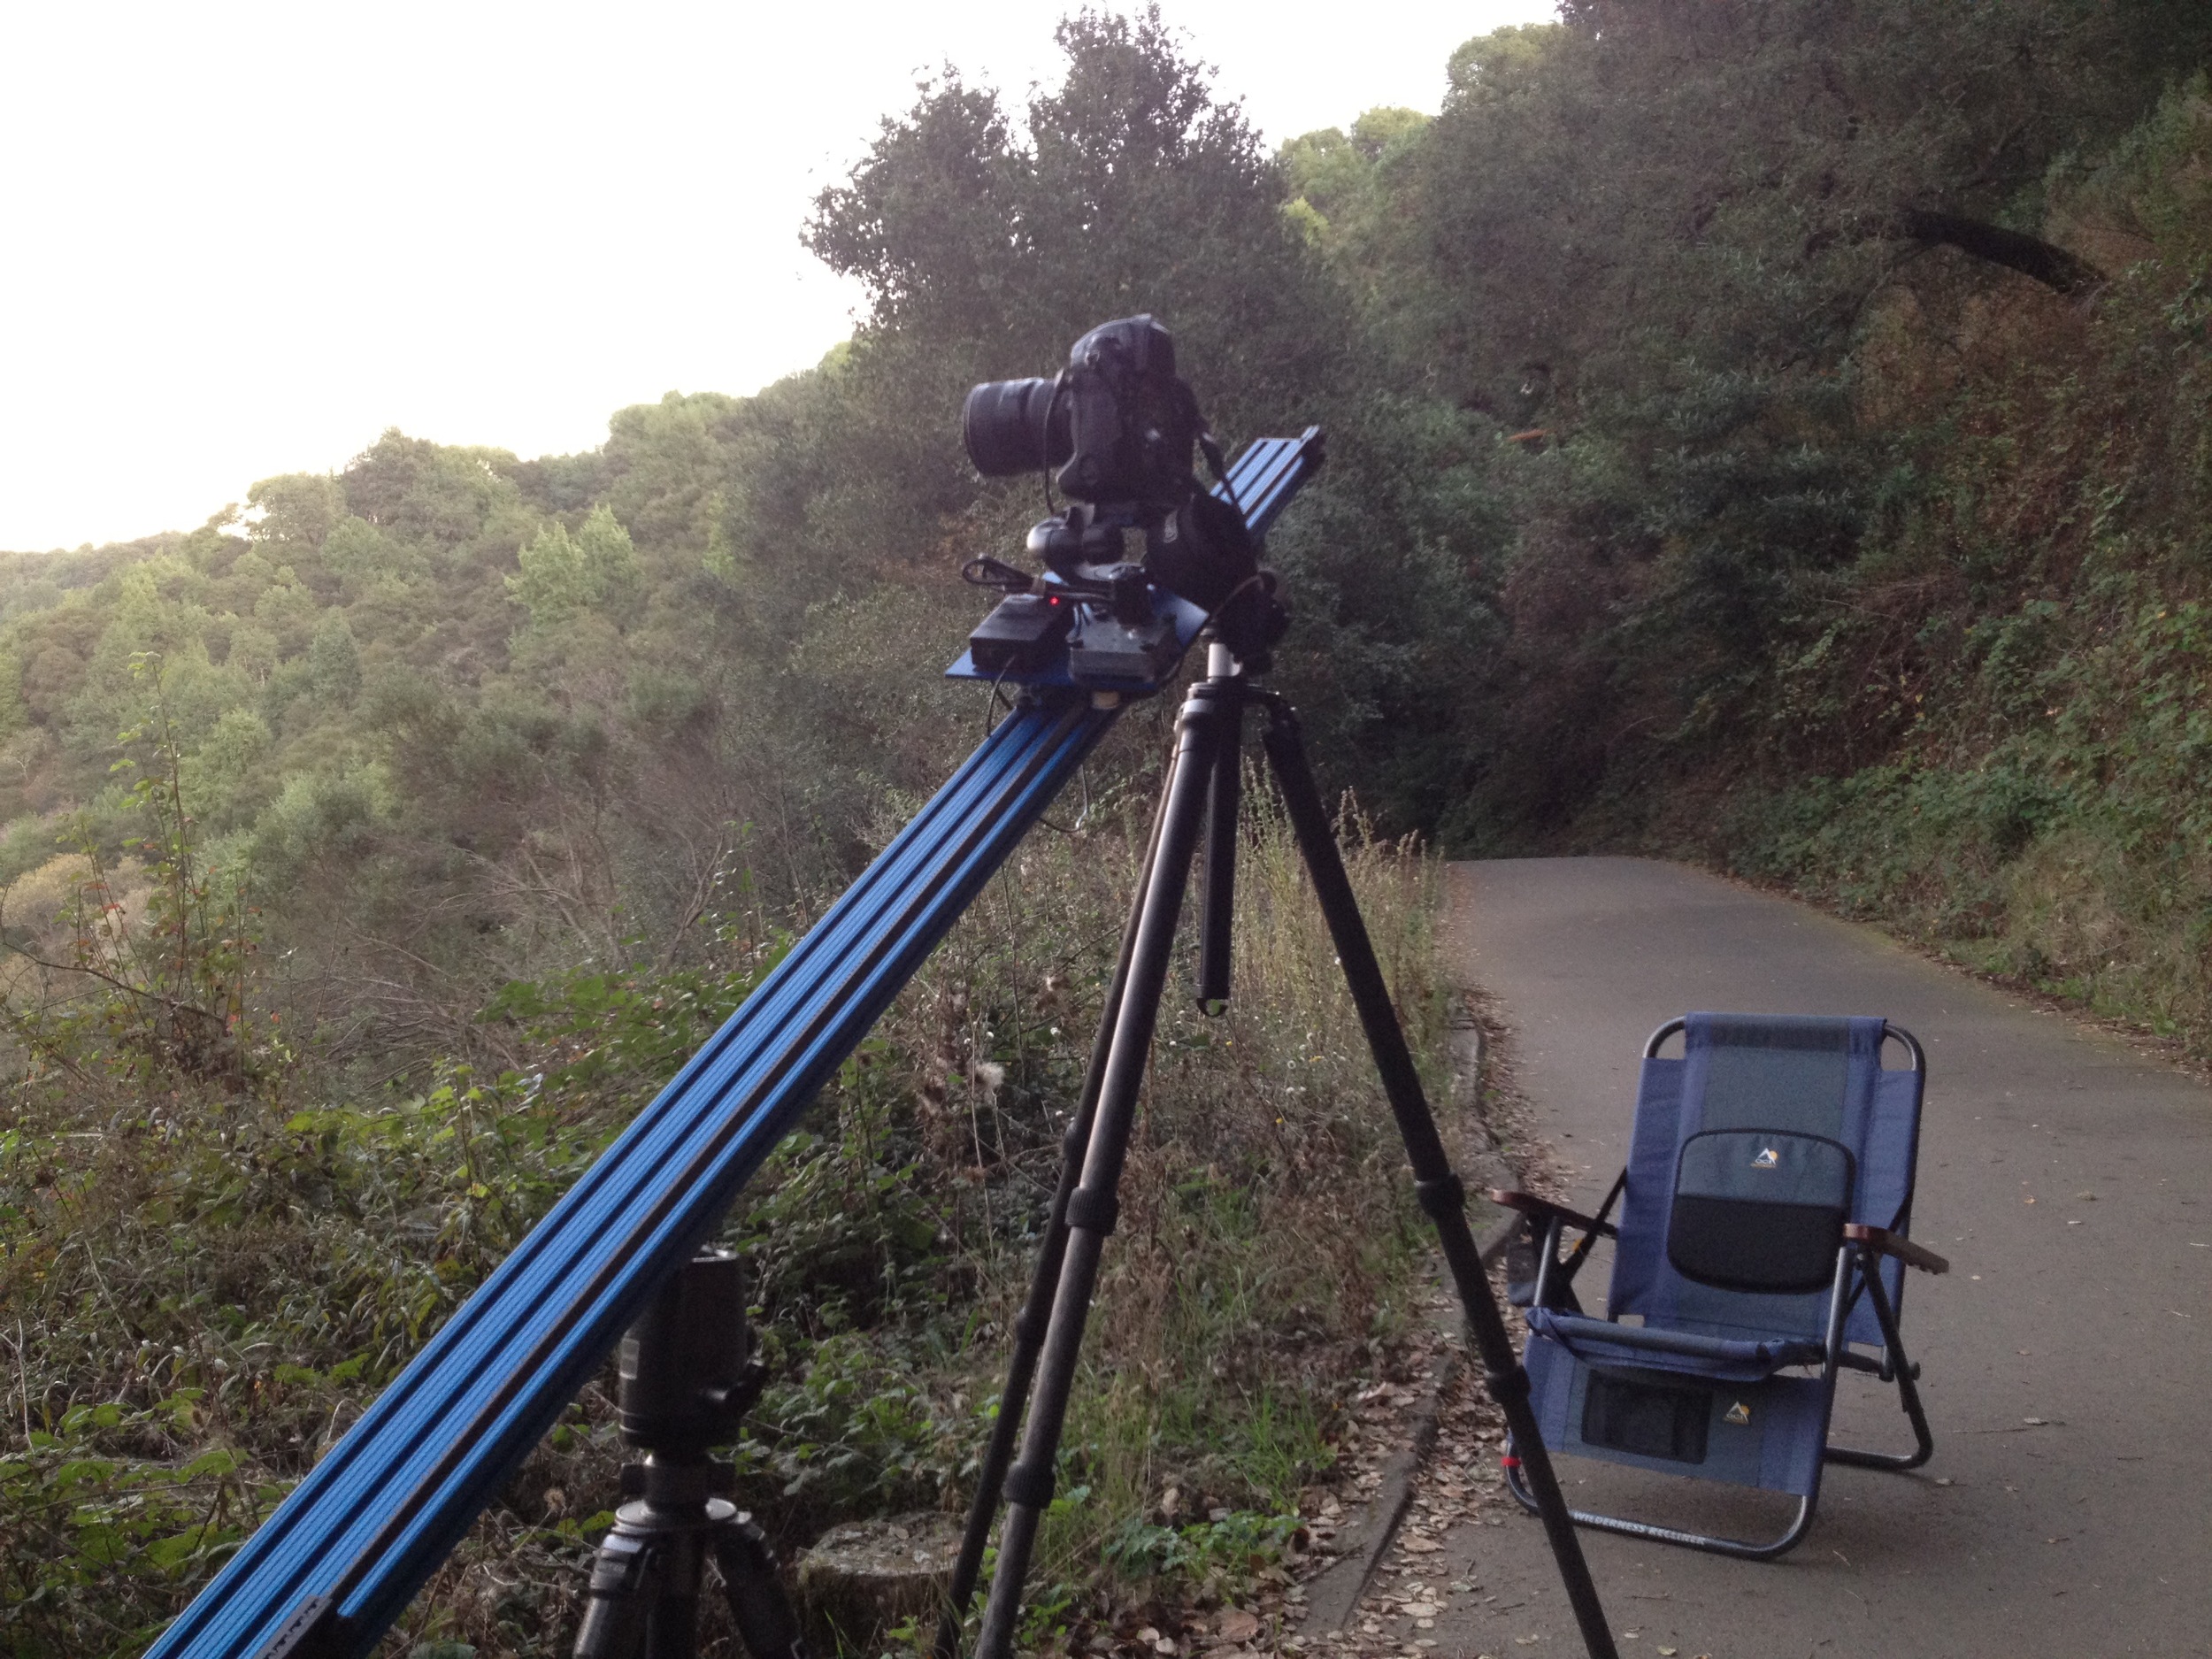
In order to get this to work, you have to have a system that can move your camera precisely after each exposure. You want it to take a shot, move the camera a fraction and take another shot. 

Timelapse Rail on location

Timelapse Rail on location

Typically this is done along a straight rail system, that has a motorized bed that transports the camera along at precise intervals. I use a kit from Dynamic Perception

Timelapse Shooting

Timelapse Shooting


Calculations are similar to regular timelapse but now you have to factor in how far the camera is going to move through the clip. 

Lets say your camera will move 5 feet.  So those 240 frames (figuring a 10 second clip) will need to be divided over five feet.  This will give you the distance that the camera needs to move after each exposure, over the time it takes to shoot 240 frames. 

One thing to keep in mind is if something is close to the camera lens, say, a pillar, a tree, or a wall, etc. you will need to move the camera in small increments. Otherwise the end film will be choppy. 

If the subject is farther away you can move the camera larger distances between shots. if you don't do this, you may not see that the camera is moving at all. Which would be a bunch of calculating for nothing.


Timelapse Part One

How are those done, those popular timelapse films?   If you have a DSLR camera you are half-way there.

Time-lapse is pretty simple if you let your camera do most of the work. In the menu system, of most of today's cameras, there is a feature that tells the camera to fire a shot every second or once every ten minutes or once every ten hours. You can set it for whatever you like. If not, you can buy an aftermarket product that is a timer that attaches  to your camera.

Next, you have to set your camera on a tripod.  This is very important keep your camera steady throughout the duration of the event.

Calculations: 

In order to get the time-lapse to look the way you want, you have to do a little math before you start.

Most films are shot at 24 frames per second. So in your calculation, you must allot 24 shots to make up one second of screen time.

First, you need to estimate the time of the event.  Be it sunset, a stadium being built or wedding event filling up, you have estimate how long this event will last.  Next you should determine how long the clip is going to be when it’s done. Once these are answered you can figure how OFTEN you will need to take a photo to make this a consistant, flowing film when it’s done. 

Lets take clouds going over a building. You have determined that the entire movement of clouds will take 40 minutes.  The final film should be 10 seconds long. That means you will need  240 images.  It also calculates that you need a shot every 10 seconds. If you are not into the math of this sort of thing, you can get an app for your iPhone called Timelapse Calculator made by CLamCam Video. I have the app and it works great.


TMLPSBB.jpg

Once you have all your calculations made, set your camera up on a sturdy tripod and set your timer inside your camera to shoot a shot once every 10 seconds for 240 frames.

Things to keep in mind while shooting timelapse are, keep your camera on all manual modes. No auto focus, no change in exposure, no auto white balance. That will make your clip as consistent as possible.

Also, make sure you have a fully charged battery. A timelaspe shoot may run for hours you don't want to run out of power. Turn off the automatic review option on your camera so that an image doesn't keep showing on your screen. This can waste precious battery life. You can always press the play button to review your work along the way.

Now you have all these images that look pretty much alike, what do you do with them?

I bring mine into Lightroom, rename them and export them as Jpegs (1920 pixels on the long side).  It’s very important to rename the files in sequential order. If you don’t you could be asking for trouble.  Most camera's file names reset every 10,000 images.  If you happen to be at that point where the filenames revert, your images will be out of order when you go build your video. So rename them.

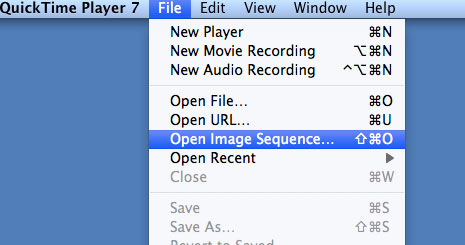
Once all your images are renamed and are in separate a folder you will need to sequence them in to a movie.  I use QuickTime 7 on my Mac. There are many options out there for both PC and MAC.

It is an older version of QuickTime but it has just what you need; image sequencing.  Pull down File>Image Sequence>browse to where your folder of images are >choose the first image in the folder.  The program will ask you what film rate and you will pull down the list and click on 23.976 (24 frames pre second that will match the industry standard) Press enter.

Screenshot002.jpg

Seconds later your film will be ready to view. 

Now, how about those timelapse films where the camera is moving?  Here is a sample – next time I’ll show how that is done.


Portrait Lighting on Location

Larree Renda, Executive Vice President, Safeway

Larree Renda, Executive Vice President, Safeway

When working with busy executives, you only have a short time to be disrupting their day.  So you have to be ready when they are.  Get there early and set up, test and be ready for them, don't make them wait!

Another  Item to consider is how much equipment to bring. When I'm photographing executives, I try be a minimalist.   Think about it, you are in and executive's office you don't want to bring in booms, huge light stands, gigantic lights, keep it simple. 

This was my set up for a portrait that was published in Progressive Grocer Magazine


Portrait Image appears in Progressive Grocer Magazine

Portrait Image appears in Progressive Grocer Magazine

When ever possible, I like to use a simple executive portrait set up. This is made up of my camera on a tripod, two to three Nikon SB900's on lightweight stands.  For my main light set up I will use one 40 inch umbrella that yields a soft light.  I bounce some of that light from the side to fill in light in the side of the face.  I use the Lastolite TriGrip white side as my reflector. 

A second SB900 is on a small stand in the background pointing directly at my subject's hair, to create a nice highlight. This light also acts as a separation light to create a rim around the subject to "separate" them from the background.  I can control the spread of the light with a grid spot.  I use the HONLPHOTO version called the speed grid.  

The exposure is pretty simple in that I first set up the camera and get an exposure that fits for what is outside the window.  Next I fit the lights to meet that exposure.

I use the Pocket Wizard Flex TT5 as the remote firing device for the strobes.

LightingSetup.jpg

Here is a lighting diagram that might help you on your next executive portrait on location.  


Everyday Photoshop

Planning in advance is one of the mainstays for professional photographers.  Be it the best time of day to shoot outside or making sure all the correct props are on set at the time of the shoot.

Photoshop is one of the tools a photographer uses to make the final project exactly what they are envisioning before the start of the shoot.  

One light set up. 

One light set up. 

As a professional photographer, I use Photoshop just about every day and the days I’m not using it, I’m thinking about using it.
— Terry VanderHeiden

As an example, I had an interior shot to create where I needed to show the depth of the room and an example of how it could be set up.   Fruit and pastries were brought in and the room was set up just how the client wanted it.  I had no control over the time of day the photograph was to be taken so I had to work around that as well.

That was the first problem to deal with, time of day.  Since the shot was in the middle of the day, I couldn't balance the interior light with what was seen through the window in back.  So in the first set up, I shot an image to expose well for the outside scene through the window and then added one light to the table of goodies.  I was shooting with a wide angle lens to show off the depth of the room so I didn't have a lot of freedom to place lights, or they would likely be seen in the final photograph. 

As a professional photographer, I use Photoshop just about every day and the days I'm not using it, I'm thinking about using it.   In this case I knew if I shot several images while the camera was locked down on a tripod, I use Photoshop to cut in the portions of the image that I needed.

Photoshop layer masks used to build the final image. 

Photoshop layer masks used to build the final image. 

Using layer masks in Photoshop, I was able to add layers of new photographs on top of the first one to make up the final image.  Layer masks gave me the ability to show off portions of each new layer that would "light up" an area of the photograph. 

So as I shot the scene, I would move lights around to light up certain areas. Then in Photoshop, I aligned them all up and created layer masks on each one to reveal what I wanted.   

Final image made up of 8 separate images and 16 different layers. 

Final image made up of 8 separate images and 16 different layers. 

The final image has the lighting I was looking to achieve. 

If you are looking to learn how to use Photoshop I am teaching Photoshop Classes in a small "hands-on" environment in my Pleasanton studio.  Check out my classes here. 


Copyright 2015, Terry VanderHeiden