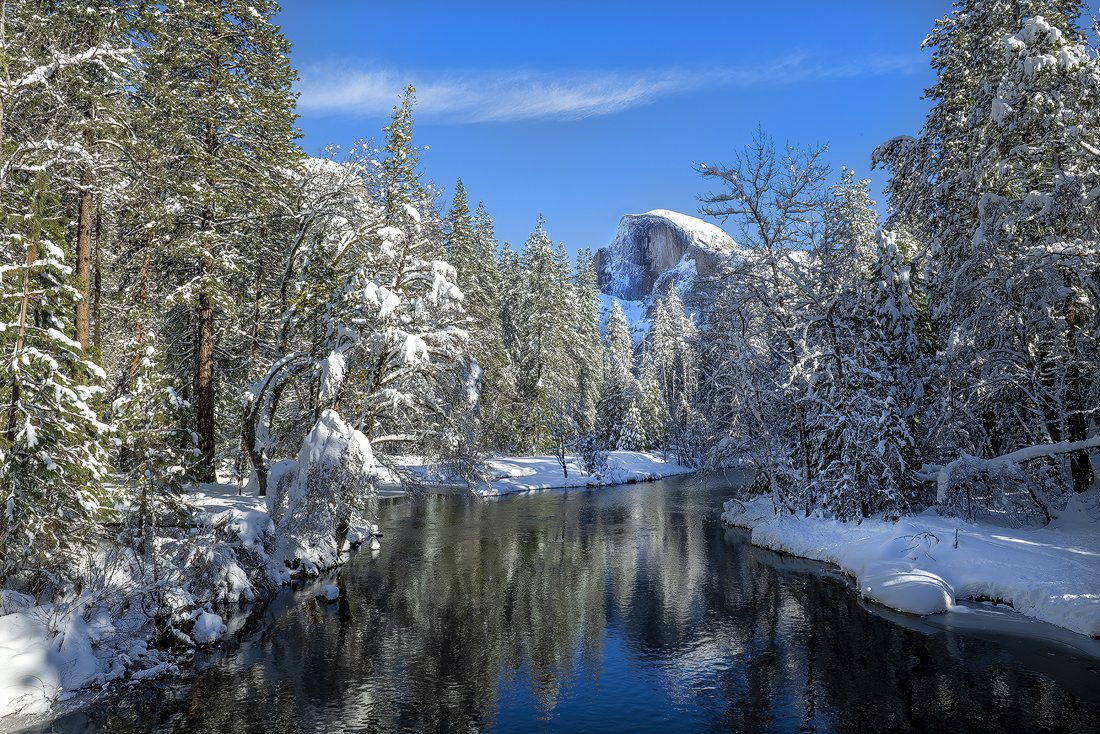
Half Dome Yosemite Valley, Yosemite National Park. Photographed from Sentinel Bridge
I know that winter in the San Francisco Bay area in Northern California is not nearly as severe as other places on this earth.
While there are people in other parts of the country right now that have to dig themselves a trail in the snow just get to their mailbox, here in sunny California, our big challenge is to decide whether or not to wear shorts on a winter morning.
Like most photographers, we watch the weather and when it does turn into bitter cold up in the nearby Sierra Nevada Mountains, we load the chains up in the truck and head up to beautiful Yosemite National Park.
Hi, this is Terry VanderHeiden, professional photographer and your host of the Nature Photography Podcast.
**
I know I have talked about Yosemite National Park before and I’m sure I will again as this is one of my favorite places to visit and photograph.
There are many reasons that Winter is my favorite time of year to visit Yosemite.
First off, there are far less people visiting the park in the dead of winter. Less people means easier parking and less competition for those choice locations for photography around the valley floor.
A visit to Yosemite Valley in winter starts with accessibility.
In the winter time, there are a few less options for getting into the park as they typically shut down the eastern entrances at the first snow of the year. This can be as early as October so even with an autumn photography event in Yosemite Valley, you must keep an eye on the weather.
By accessing the many available weather apps, you can see when fresh snow is expected for the valley floor. And this is the trick.
At 4000 feet in elevation, Yosemite Valley is where you want the snow for some breath-taking landscape images. Where the top of half-dome is at 8800 feet, there could be snow on the top of half-dome throughout the year.
It’s the valley floor snow that makes this place look spectacular.
The edges of the Merced River covered in snow is exceptional. Trees dusted in snow and ice lining the banks of the river that runs through the heart of the valley, can make the foregrounds of your landscape images phenomenal.
Using some snow-covered boulders sitting sturdy as the river cascades around them, makes for a gorgeous lead-in subject matter. Having a good lead in will bring the viewer into the frame to see El Capitan reaching up into the sky.
The road to Glacier Point is normally closed during the winter months so scratch that view off your list unless you feel like making a pretty rigorous 9 hour hike up that side of the valley.
The Merced river seldom freezes over but it can offer a spectacular rare occurrence in late winter/ early spring called Frazil ice.
Frazil ice is produced from the mist of Yosemite Falls that freezes in midair then makes its way into the flowing river. To add to that, chunks of ice can fall off of the granite walls and drop into Yosemite creek that feeds into the Merced River.
This can look like white lava as it slushes its way slowly down the river.
The best place to view this event is to make your way up to the Yosemite Creek Bridge, below Yosemite falls, where you can safely look down and watch the river slowly move along like a big snow cone was dropped up stream.

Popular Tunnel View, Yosemite Valley, in Black and White
You can also find Frazil Ice at Bridalveil falls and Ribbon Falls and a few other places in the park. This is fun to watch and it is unpredictable as it moves and slugs along.
Frazil Ice can occur most of the time when there is good water quantity from the surrounding waterfalls. This would be when the temperatures rise enough to melt the snow pack in the higher elevations but over-night temperatures fall below freezing.
Most of the time this is visible in the early morning typically before 9:00 am. And worth planning around to check out on your next winter visit to Yosemite.
There are more reasons to visit Yosemite in the wintertime, after the break.
***
Do you struggle to get sharp images of your wildlife? I’m not just talking just clear images but Razor-Sharp images.

Razor-Sharp Wildlife Images
That is the subject of my new E-book, Razor-Sharp images available for pre-order exclusively on my web site; imagelight.com.
I take you step-by-step on how to work with diffraction, hyper-focal focusing and determining the best shutter speed for the wildlife lenses you are currently using.
I go into detail on how to use focus stacking for your close-up work and for your landscape work and why and when you use this technique to create the sharpest images possible.
Once we solve all the variables in the camera, I also take you through my favorite sharpening and de-noising softwares that I use every day. I show you step-by-step on how to use them to create Razor Sharp Images.
The eBook is full of images for use as examples and step-by-step instruction along with pro-tips to get you producing the sharpest images of your life!
Pre-order your copy today or if you are listening to this after March of 2022 buy it with an instant download to get started right away.
Go to my web site; image light dot com. That is spelled, I-M-A-G-E-L-I-G-H-T dot com. And head over to the digital products page to get your copy.
Thank you in advance for supporting my work here on the Nature Photography Podcast and by visiting my website where I have digital products for sale. All proceeds help me afford to make more content like this for everyone to enjoy.
Now back to more on photographing Yosemite in Winter
Another seasonal phenomenon that many people are aware of is the firefall at horsetail fall. This is where, if conditions are right, the angle of the sun in mid-February hits Horsetail fall and the setting sun pours backlight into the tiny ribbon of water and it looks like fire is cascading down the edge of El Capitan.
The original firefall was a man-made event that started way back in 1872. The owners of the Glacier Point Hotel would dump bon fire embers over a cliff to the delight of the onlookers below. They said it looked like a waterfall of fire coming down off the mountain. Which, I guess, it actually what it was except there was no water involved.
By the late 1960’s huge numbers of spectators trampled meadows and other areas trying to get a view of the extraordinary event, that it became vividly clear that the park was being damaged for the viewing pleasures of the visitors. Not to mention the fire hazard it caused each time.
In 1968 the Park service finally put an end to the practice of the hotel dumping embers over the edge. Ironically the Glacier Point Hotel would be lost, to you guessed it, fire, the following year in 1969.
When this natural event, the firefall at horsetail fall was discovered by photographer Galen Rowel, in 1973 and it was dubbed, firefall.
There are a few variables that have to be in place in order for Firefall in Yosemite valley, to be visible each year.
First and foremost is there water flowing over the horsetail fall?
In order for there to be water in the falls, there has to be a generous snow pack up on the top of El Capitan. Also, the weather has to warm enough to melt the snow and get the water to flow.
Those are too big variables. Since this is California, the water situation has been difficult to count on. Having enough snow on top of the mountain is hit and miss and, in some years, it just leaves everyone dry.
Even though the lighting from the sun occurs in February, the temperature has to be warm. Even if there is a good snow pack it might not be warm enough. While it might be nice on the valley floor, the temperature at almost 8000 feet where the water needs to flow can still be too cold to move the water off the edge.
To add to these variables, Yosemite national park has to deal with the popularity of this event each year.
As you can imagine, tourists have brought this problem on themselves. When this was discovered in 1973, nobody was lining up to watch this event.
However, in recent years, people have been known to leave their cars, with the doors open, idling in the middle of the street to jump out and get a picture of the firefall. Massive traffic jams have ensued and now all parking near the best spots to view the firefall have been shut down. The nearest point to park is a fair distance from the best viewing spots and that is over at Yosemite Falls parking area.
Yosemite National Park has also instituted reservations to enter the park during these times in February, but those reservations are on again off again, so planning ahead is critical.
To add to all these shenanigans, people and photographers’ plant themselves in the best viewing spots well in advance of the 5 pm showing. So you should make sure to arrive early to get the best spot. Even at that, you may be sharing a tripod leg with stranger that evening.
Lastly the big variable that is hard to nail down is the changing weather. You see, if there are overcast skies that evening, then the setting sun will not light up the waterfall and create this cool effect of water looking like fire cascading down the side of the mountain.
The time of year to see this is February between the 10th and the 28th. Sunset starts around 5:00 pm so you need to be in position about 3:30 to avoid some of the crowds.
The picturesque event can also occur in October but seldom is there water at the top of El Capitan in October so that is not something you want to plan around, just get there if there is heavy rain that time of year.
You have to plan ahead for your clothing as the mid-day when you are hiking to your best spot can be warm, coming down in the cold of the night you will be wishing you had layers to keep you warm.
Speaking of keeping warm, I just received these photographer’s gloves from the Vallerett (VAL-AH-RET) company.

These are the Hatchet style gloves and they are amazing. The gloves are made from full leather and are very soft on the outside that also help keep a confident grip on my camera gear. They are very warm and comfortable on the inside as well, with a soft 100 % Merino Wool lining.
These gloves make carrying a cold tripod a snap as they are very well insulated.
The best part of these gloves is that they have what they call “flip tech” fingers. This is where the thumb and index finger flip out of the way to expose your bare finger tips so you can have true dexterity when operating your camera dials and touch screens.
They have integrated magnets into the finger tips to hold the fingertips of the gloves out of the way, while you are using them and then easily slip them back on your fingers to get back to warm and toasty hands.
You can pick up your own photography gloves at their website, cleverly named, photographygloves.com
In order to photograph the firefall successfully you will need a few things.
First you are going to need that tripod. Since you will be shooting in low light, a tripod will keep your images sharp, without having to boost your ISO.
The lens you chose is dependent on your choice of composition and shooting location.
Some folks are content with standing in one of the viewing areas and shooting like everyone else.
While others will go do some hiking to find the unusual angle that no one has seen before.
This might mean being a fair distance away and using a long lens to capture the fall through the trees. It’s best to experiment with locations during the day, because since the setting sun drops pretty quickly, you won’t have much time to change positions.
When it comes to exposure, consider that the final shots where the light is just perfect, will be a sliver of sunlight, lighting up a small portion of the otherwise black mountain.
If you were to use Auto exposure, you might find that your camera meter will try to boost the tones on the black mountain to medium gray, thereby blowing out the waterfall itself.
So this a time when you want to be on Manual exposure and do some test shots as you go along, to get the proper exposure when the sun finally sets.
One pro tip for you: DON’T LEAVE EARLY. One of the most disappointing things I see all the time is people leaving too early from a sunset shot.
In the case of the firefall in Yosemite valley, wait until after the sun is fully set. Many times an afterglow of purple, violets and reds can pop up and make the most stunning photograph of all.
Also, some people will be in place by the early afternoon and wait all day for the shot. They see clouds come in and think, that today is going to be a bust and sunset won’t be seen. However, if you just wait it out, the sun may drop below the cloud cover and light up the waterfall. This can be extra spectacular with brightly lit pink and purple clouds in the sky of your background. So don’t leave early.
Photographing at Yosemite National Park is great any time, but the winter is really a time that shouldn’t be missed.
Thanks for listening to the Nature Photography Podcast, until next time, this is your host, Terry VanderHeiden saying thanks for listening.