How are those done, those popular timelapse films? If you have a DSLR camera you are half-way there.
Time-lapse is pretty simple if you let your camera do most of the work. In the menu system, of most of today's cameras, there is a feature that tells the camera to fire a shot every second or once every ten minutes or once every ten hours. You can set it for whatever you like. If not, you can buy an aftermarket product that is a timer that attaches to your camera.
Next, you have to set your camera on a tripod. This is very important keep your camera steady throughout the duration of the event.
Calculations:
In order to get the time-lapse to look the way you want, you have to do a little math before you start.
Most films are shot at 24 frames per second. So in your calculation, you must allot 24 shots to make up one second of screen time.
First, you need to estimate the time of the event. Be it sunset, a stadium being built or wedding event filling up, you have estimate how long this event will last. Next you should determine how long the clip is going to be when it’s done. Once these are answered you can figure how OFTEN you will need to take a photo to make this a consistant, flowing film when it’s done.
Lets take clouds going over a building. You have determined that the entire movement of clouds will take 40 minutes. The final film should be 10 seconds long. That means you will need 240 images. It also calculates that you need a shot every 10 seconds. If you are not into the math of this sort of thing, you can get an app for your iPhone called Timelapse Calculator made by CLamCam Video. I have the app and it works great.

Once you have all your calculations made, set your camera up on a sturdy tripod and set your timer inside your camera to shoot a shot once every 10 seconds for 240 frames.
Things to keep in mind while shooting timelapse are, keep your camera on all manual modes. No auto focus, no change in exposure, no auto white balance. That will make your clip as consistent as possible.
Also, make sure you have a fully charged battery. A timelaspe shoot may run for hours you don't want to run out of power. Turn off the automatic review option on your camera so that an image doesn't keep showing on your screen. This can waste precious battery life. You can always press the play button to review your work along the way.
Now you have all these images that look pretty much alike, what do you do with them?
I bring mine into Lightroom, rename them and export them as Jpegs (1920 pixels on the long side). It’s very important to rename the files in sequential order. If you don’t you could be asking for trouble. Most camera's file names reset every 10,000 images. If you happen to be at that point where the filenames revert, your images will be out of order when you go build your video. So rename them.
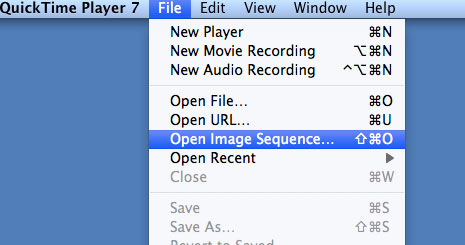
Once all your images are renamed and are in separate a folder you will need to sequence them in to a movie. I use QuickTime 7 on my Mac. There are many options out there for both PC and MAC.
It is an older version of QuickTime but it has just what you need; image sequencing. Pull down File>Image Sequence>browse to where your folder of images are >choose the first image in the folder. The program will ask you what film rate and you will pull down the list and click on 23.976 (24 frames pre second that will match the industry standard) Press enter.
Seconds later your film will be ready to view.
Now, how about those timelapse films where the camera is moving? Here is a sample – next time I’ll show how that is done.