
As wildlife photographers, we probably pass by hundreds of possible subjects every day and we don’t even give them a second look. Fascinating creatures, hunting, eating and surviving, right under our noses.
I’m talking about the world of Close-up photography and photographing insects.
With close-up work, the subjects are boundless. Especially when you are talking about insects. They are easy to find in just about any season, the only catch is, they aren’t the easiest wildlife subject to photograph. You can’t call them to your shooting spot, they don’t take the same path for water every evening and a guide is not going to help you much, you have to track them down yourself.
Hi I’m Terry VanderHeiden your host of the Nature Photography podcast sponsored by Image Light dot com. In this episode, I’ll give you some tips on how to start in Close-up photography, what equipment you will need and how to overcome the challenges of working very close to your subject.
As always, we will take some time to talk about our subjects, the insect, and learn a little bit about them and how we can take better Close-up images of them. We want to represent their habitats and struggles in their daily lives, for the people who view our images.
Let me start by giving you a little history on how I started out making close up images.
When I got started in photography, the first thing I wanted to photograph were things in Close-up. I found it deeply interesting to see the detail in things we never paid attention to. The texture in a football. The detail in coins, the scratches and the marks that were made on all kinds of surfaces from leather to porcelain. It was fun for me to create an image and then quiz my family as was to what the subject was when all they had to go on was the section of the image I shot in Close-up.
Since I grew up on a small farm, wildlife was everywhere. When I started to look close at things, there were even more subjects than I could ever photograph.
After doing a little research at the library (yes, this was before the internet) I realized that I needed to move the lens away from the film plane in order for me to focus closer to my subject. They had the same tools we have today that were called extension tubes but a more versatile device I saved up for, was a bellows.
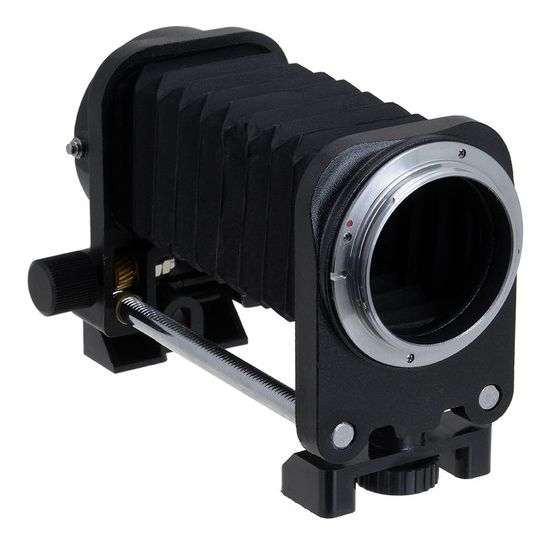
A bellows contraption was essentially an expandable black fabric box that sat on a rail system. They still sell these things if you are so inclined to get really close to your subjects. I would thread on the lens on one end, and then attach the bellows to the camera body. So, this would extend my lens away from the camera, and it allowed me to get very close to my subjects.
The bellows would extend about 6 inches in length and fully extended I could shoot things up to 8 to 1 in a Close-up ratio. Truly Macro photography by definition.
For true macro photography, you have to have a magnification of 1 to 1 or beyond. Otherwise everything else is considered Close-up photography. Not that it matters really, but so you know one to one means that the magnification is the actual size on the sensor of your camera.
Since a full frame sensor these days in horizontal position is typically 24mm tall by 36mm wide.
To achieve 1:1 on an image your subject has to be actual size. Let’s take a US quarter. This coin is just about 24mm tall. To photograph it at 1:1 (actual size) you would have to fill up the frame from top to bottom with the quarter. That close and closer is true MACRO photography.
Suffice to say most of us will be doing Close-up photography which will be plenty to learn without getting into macro photography.
Now back to my bellows set up. On our farm, we had commercial bee hives, so one day I decided to take one of the stock honeycombs laying around and use it as a background.
These honeycombs are pre-made so the bees don’t waste time and energy building the honeycombs, they just start filling them up with honey.
This makes a hive that much more productive when the beekeeper is harvesting honey.
The honeycombs also make a great patterned background to use in photography.
One of the things we learned, was that insects don’t move around near as fast if they are cold. So, the simple solution is to capture your subject and put it in the refrigerator for a short time to “chill” them out, so to speak.
Since I was using this long bellows system, the downside was that it took a lot of light in order to make an exposure. I couldn’t afford an electronic flash in those days so I used high intensity halogen reading lights to light up my honeycomb set.

In order to make it look real, we poured a bit of honey on the honeycomb, got a good focus and then went to the refrigerator to get our subject.
We gingerly placed the subject on the honey and started photographing. What we didn’t plan for, was that the high-intensity lights were going to quickly warm up the set AND the subject.
We also didn’t think it all the way through, because we used a hornet instead of a honey bee, which when warmed was pretty ticked off as us and spent the next half hour chasing us around the bedroom.
Even though my first big experiment with close up photography went a little sideways, I was hooked and I’ve been shooting close up subjects ever since.
For those of you just starting out with Close-up Photography, I will go over everything you need equipment-wise, to get started, as well as some tips for having success right out of the gate. For the listeners that already have experience with Close-up, I’ll go over some advanced techniques that will really push your Close-up Photography to the next level.
We’ll get started with this, right after the break.
When you are starting on Close-up Photography you are going to need some specialized equipment. If all you have is a beginning camera kit, the first piece of equipment you can get to begin with are Close-up filters. These are simple filters with a magnifying glass that allows you to focus closer on smaller subjects. They simply thread on to the front of your existing lens and they change the working dynamics of say a normal lens.
While they do allow you to get close up to your subjects, the quality of the glass in these filters is not the best, so you might lose a bit of quality in the final image. This is a budget option for photographers starting out to see if they even like close up work.
The next most inexpensive item is a set of extension tubes. These are barrels that look like lenses but there is no glass in them. They are built to put directly on to your camera body, like you would a lens, then you attach your existing lens to the end of the tube.
A lot of times they are sold in a kit of three, that give you different lengths. They can be used one at a time or stacked together to move your lens farther from the camera body. The farther you can get your lens away from the camera, the closer you can focus.
So, photographing a simple flower, you can’t get close enough to fill of the frame with the petals. However, when you put on an extension tube, you can focus nice and close and only choose to show the center of the flower if you wish.
The drawbacks of an extension tube are mainly that you lose infinity on your lens or the inability to shoot distant objects. So, you can’t just put the tube on and shoot anything you want. You can only be shooting Close-up subjects when using an extension tube.
The next step up for equipment is a macro lens it can also be called a micro lens. That’s what I use. This lens is the most versatile lens in my bag, in that you can use it to focus closely, in many cases down to one to one or use it for portraits or use it for creating a landscape. It’s probably the first lens I’d take if I was limited for some reason to only one lens. I highly recommend them.
I use a 105-mm micro lens as part of my Nikon gear, (for some reason Nikon calls them Micro lenses not MACRO lenses.) A 105mm lens helps with the subject to the front of the lens distance. When I have the lens all the way racked out,(one to one) my distance between the front of the lens and the subject is about 4 and a half inches. With shorter micro lenses, like the 55 mm, all the way racked out, you have to be only an inch or two away from your subject for full magnification.
You can probably see how being only an inch away from your subject, that happens to be a skittish butterfly, could be problematic. This is why a longer macro lens is easier to work with. I know that Nikon makes a 200mm Micro lens and I assume other manufactures have lenses that are comparable.
These lenses work the same but the longer the focal length the longer the working distance can be.
The biggest problem with doing Close-up Photography is the lack of depth of field. The areas that are in focus when you are shooting with extension tubes or a macro lens are VERY narrow. The closer you get, the less depth of field you will find.
When you are photographing an insect, the front of the face may be in focus but the rest of the insect drops out of focus very fast.
This causes two problems. First is the capture. There you are, your macro lens is almost all the way racked out on full magnification, you are 5 inches from the honeybee sitting on the flower.
As you lean in, any slight movement from you, the bee, the flower being moved in the breeze, the bee’s face falls in and out of focus. It can be hard to be in the right position for a capture to have the favored spot of the honeybee in focus.
To combat this, we usually will move our aperture to a tiny hole, maybe f/22 or f/32 to have a more extended depth of field. Though it’s hard to see it through the lens, but when you look at the completed exposure you will see much more of the honeybee is in focus.
Whenever you are shooting a wide depth of field by adjusting your lens to f/22 or smaller, then your second problem rears its head.
You need a lot of light to shoot something at f/22. If you are trying to make a capture where you subject just crawled under a leaf, then even being in the bright sun won’t help you. The shadows are just too dark to shoot at f/22 and have a speedy enough shutter speed to hand hold or stop an insect’s slight movement.
Obviously, you could boost your ISO but everyone knows that when you increase the ISO you are introducing noise into the photograph. Noise, will make the image not look as sharp, and in some cases, could seriously damage the final image.
My rule of thumb; is only to increase the ISO when you HAVE to. This is one of those cases where you may not need to raise the ISO to get the exposure you want. More on this, after the break.
When you don’t want to increase your ISO but you may need to, in order to get the shot, consider using the electronic flash.
One of the big drawbacks of using flash is that, by nature, the light it produces drops off very quickly. So, trying to use a small aftermarket flash for shooting something at any distance after 10 feet, is pretty futile.
However, in close up work, the flash is only a few inches from your subject, so the light fall-off is not a huge problem.
Can you use the flash that pops up on top of the camera? Yes.
Can you use a flash that you attach to the camera’s hot shoe? Of course.
Let’s go outside and find a subject or two and see how this flash idea works.
I’m outside at a public garden and it seems to be teeming with insect activity. Namely honeybees bounding from flower to flower.


I’m using my flash on a camera connected to a hot shoe on top of the camera and I have lowered my shutter speed to get more ambient light to blend in the background.
As I get really close, I’m getting some weird light fall-off from the flash. It seems to only happen when I’m really close. I believe that it is the flash casting a shadow caused by the front of the lens. I have a workaround for that.
To solve this flash problem, I picked up a flash that is perfect for close-up, it’s a ring flash. This unit attaches to the front of the lens so it can never create a shadow from the lens because of its right in front.
The brand I bought is called Nissin MF18 – this has some nice features to it, but the best part for me is that it divides the ring into two sides. Each side is independently ratioed. Which means I can put more light out of the right side and have the left be just a fill-in or vice-a-versa.

Being that it’s a ring light, the light covers a nice wide area, and with the ability to manually input independent power to either side makes it quite versatile.
Set up was a snap and I could start shooting right away since it has TTL, Through the lens metering. It will fire the flash and shut it off when the exposure is right, all before the shutter closes. Really nice.
This is a very easy set up to use and you will get some great Close-up shots with just adding a ring light to your arsenal.
Next up, how do we deal with that pesky shallow depth of field? Stacking, of course.
If you haven’t heard of the focus stacking concept, this is how it works. You shoot a shot with your focus on the front of the subject, then the next shot with the focus change slightly to get a little deeper into the subject.
You create a series of images with only the focus changing. Then bring all those images into a computer software, like Photoshop and merge only the sharp images into one fully sharp final image.
I happen to use a software by Heliconsoft – called Helicon Focus. This stand-alone product works with Adobe Lightroom so can export out a series of images right from Lightroom and return to Lightroom a finished version.
There is a word of warning here, when doing extreme Close-up images, you are likely to use 20 to 100 images depending on how much coverage you are looking for.
While the software does a really good job of aligning the images, you are better off to be working with a sturdy base like a tripod or at least a monopod.
Another product that Heliconsoft sells is called the Helicon FB tube. This is a small extension tube that works with your macro lens to automatically change the focus in tiny increments. This makes focus stacking very easy.
Some camera’s now have this feature built in to the camera where they will change the focus in small increments for focus stacking, but this FB tube really works great.
Let’s go outside and I’ll give you my step-by-step work flow to focus stacking.
Alright so we are outside ready to do some focus stacking. I’ve chosen a flower this time as my test subject.
The camera is on a tripod, the FB Tube is attached to my camera and my 105 micro from Nikon is attached to the tube. Since the FB tube acts as a slight extension tube, I have lost the ability to focus on infinity, but I have gained the ability to focus a little closer.
When you are getting ready to compose for a focus stack, you need to consider that the software will arrange the images to fit, so if you start too close, something might get cropped out in the final image. My recommendation is to compose a little wider than normal so you can crop in after your stacked image is complete.
Your camera is stable, now make sure your subject is stable. If the subject is a flower or and insect on a flower, even a slight breeze can move this setup greatly while under close magnification. Be sure to anchor the flower somehow. Maybe a clamp to your tripod to a clamp on a stick.

I use a very cool tool called the Plamp 2. It has a clamp on one end that I attach to my tripod leg, then it has a segmented snake arm of about 20 inches that ends in a very small adjustable clamp. I can use this device to clamp a stem of a plant to keep it from moving during the shot and the end clamp is so delicate, I don’t harm the plant during the shot.
The plamp 2 is made by the Wimberly folks and this product can be picked up at their web site tripod head dot com. Well worth it.
Since I am stacking the image, I need to be on manual exposure. I want all the exposures to be the same when I bring them into the computer. If they are off a bit, they will all be off by the same amount, which would be easy to fix as I shoot only RAW images all the time.
If I am using flash, I want to make sure that the flash has recycled properly between flashes to keep the exposure consistent. So, I don’t want to shoot too fast. If I’m not using flash, I can put my camera up to the highest frames per second and the FB tube will keep changing the focus with each shot.
To start a stack, I shoot a photo of my fingers in front of the lens. That way I know this is a new stack when I am looking at these in Lightroom.
I then take a pair of tweezers or an edge of a card that I suspend just in front of the subject to get my first focus on. That way I know that my stack will start in front of where my subject is and eventually will come into focus.
Once that is done, I start shooting. I keep shooting until I am way past my finished focus line. I can always toss out images that I don’t use when I am selecting the images in Lightroom to send on to the stacking software.
You don’t have to have an FB tube to do this kind of work, you can always manually change the focus each time. The FB tube just makes it easier.

The best part of using this focus stacking method is that I am now shooting at f/6.3. I do this for a couple of reasons. I don’t have to shoot at f/32 to maximize my depth of field. With stacking, I can get everything in focus that I want. Also, I have found that f /6.3 is the sharpest f/stop on this lens. Lenses vary but usually, the sharpest part is about two stops over wide open.
Shooting at a wider f/stop lets in a lot more light. So, my flashes don’t have to use too much power so they can fire more rapidly. And I can easily bring in more of the natural background without having to lower my shutter speed too much.
So that is the primer on close up photography, contact me if you have questions, you can always reach me through my web site – image light dot com.