Nature

Yosemite in Winter


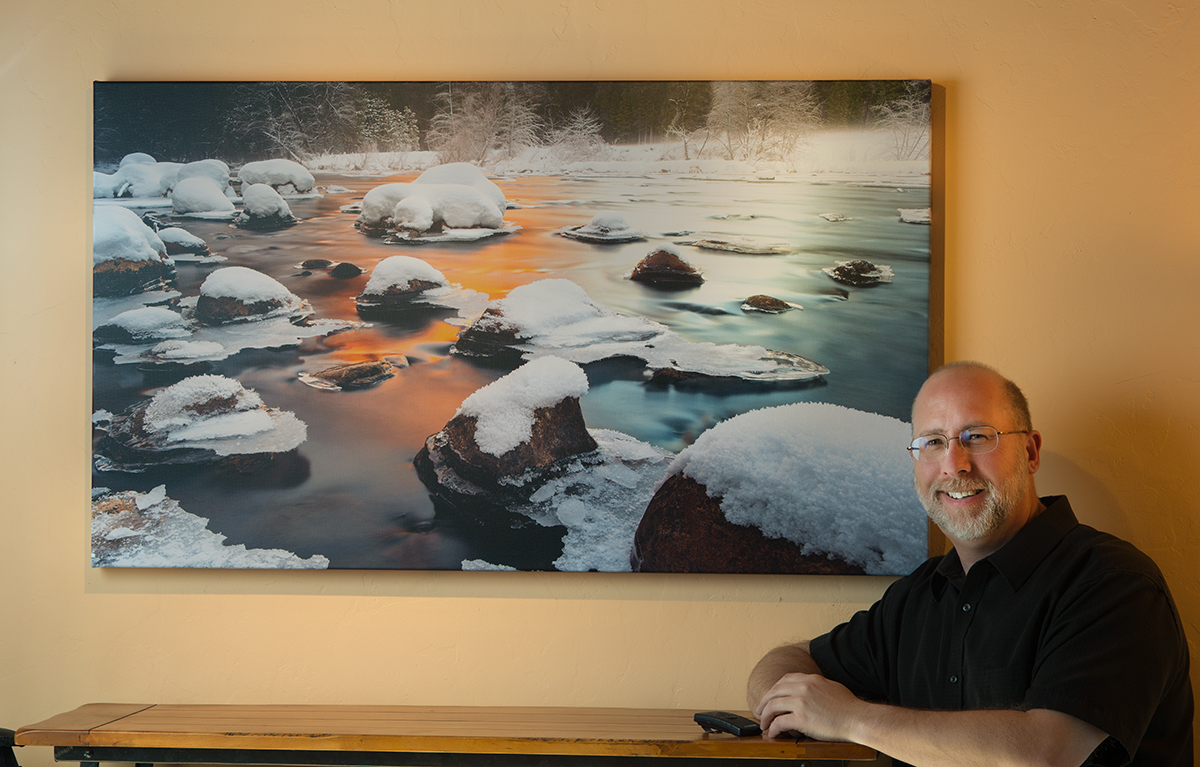
My most recent wall print from my winter trip to Yosemite has been completed.  It's a 50 x 28 Museum Grade Canvas Print on stretcher bars with surface print protection.  The print sets off the wall 1 3/4 inches.

***

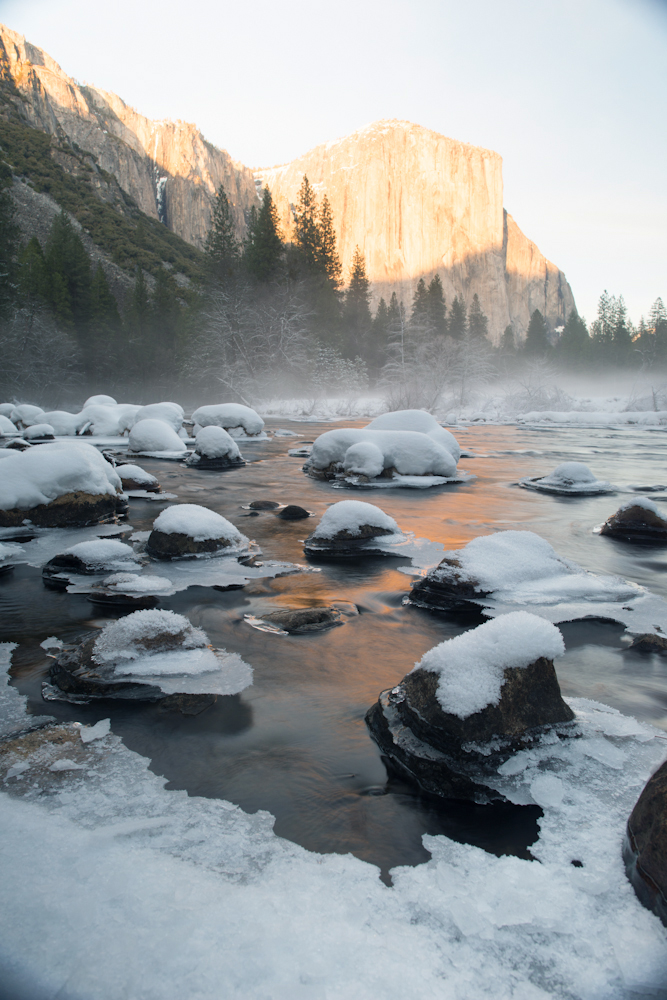
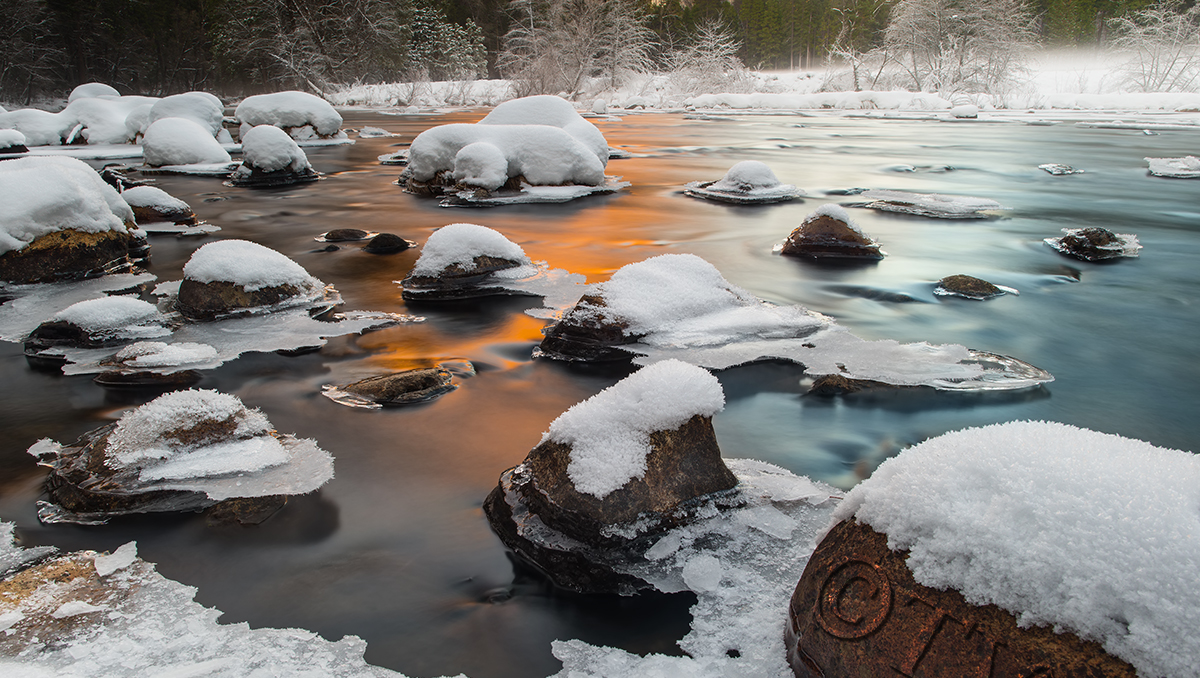
I was very lucky to capture a moment along the Merced River just west of El Capitan this winter.  While I started out the shoot, planning on capturing El Capitan's granite face against the valley floor,  I think I did much better.

Fellow photographer, Dave Courtney and I, set out on one of coldest days of January to photograph Yosemite in the winter. The park was a frigid 25 degrees when we arrived so everything was cast in a frosty covering of ice. We stopped several places to shoot and finally ended up in a spot I have photographed many times along the Merced river and got ready for the sunset.

The plan was to shoot images as the sun dropped in the sky, capturing the stately El Capitan granite monolith standing guard over the valley floor.

You never really know what the sunset is going to be like in Yosemite Valley.  Clouds and  smog particles in the west play a huge roll as to whether your photographs are special or not. Many times, cold clear skies  yeild a vibrant deep cobalt color but without clouds, there can be too much blue in the photograph.  A day with white puffy clouds is preferred, taking second only to the gray and black storm clouds that can be quite dramatic. This particular day had little in the way of clouds.

We did get lucky though. Unbeknown to us, a temperature inversion was happening along the coast of California as warm air started to drift over the state, trapping smog particles against the cold air from the earth's surface.  In the San Francisco Bay Area, it can turn into a "spare the air day", where we try to restrict more particles from being sent into the air by eliminating the use of fireplaces and such.  The bottom line for the photographer, is that all those trapped particles can result in some spectacular colored skies.

Along with this temperature inversion, we had a small amount of wispy clouds to the West, that "softened" the sunlight as it fell upon El Capitan.

The extreme cold conditions in the valley during that week served a few purposes for out photography.  One, it helped fog develop in the valley but not so much that it obliterated the view.  Second, it helped preserve the snow from a couple of days earlier by staying so cold, the temperature didn't allow the snow to melt and fall off rocks and trees.  The outcome, was it looked like fresh snow had just fallen everywhere.  Lastly, the extreme cold froze the edges of the Merced river allowing me to safely move a tripod farther out on the ice, to capture the composition I was looking for.

As the sun dropped in the sky, El Capitan became more and more yellow and orange. Those colors started to reflect off the river creating a fabulous display of color across the water. I also noticed a cooler, teal color coming in from the right as this was a reflection of sky and cold granite South wall of the valley, that hadn't seen the sun because of the low winter sun pattern.

I had a decision to make.  Capture El Capitan as it changed color before our eyes as the sun set, or, tilt the camera down and capture just the water and the effect of the reflecting sun. Since there were almost no clouds behind El Capitan to break up the sky texture, I went for the river shot.

I love the way this turned out.

This print is available for purchase in a limited release (without watermark).  It is being sold as a 50 x 28  Museum Grade Canvas Stretched Print ready to hang.  For $1,150 plus tax and shipping.  Please contact me directly at terry@imagelight.com for orders. The image is also available in other sizes both larger and smaller and float frame options are available at cost.

Ano Neuvo Photography

I just spent a few days last week photographing the elephant seals at Ano Neuvo State Park in California. While this is a fun photographic opportunity to photograph the Elephant seals as the come back to this state beach every winter. These seals can be engaged in bloody battles for territory and mating rights.  This is also the time of year the females come ashore to deliver and ween their pups. So you can see it all during this short window of time. There are few things to look for, before you plan your trip - the most important - you have to have a ticket.


Be sure to get tickets to go on the tour well in advance. The prime months to see the seals are January and February (thats when all the seal activity happens) and tours book up rather fast. You can buy tickets (about $7 for adults) for a tour up to about 60 days in advance. Remember, you can't see the seals without being on a tour at this time of the year, so plan ahead.


When you are choosing a tour time slot, definitely  go as early as you can in the morning. The light is much better on the seals early in the morning and since there are so many limitations as to where you can stop and shoot photographs on on your tour - the morning is the only way to go. These animals are highly protected at this time of year so you will moved in small groups by docents and rangers and you will only get to spend limited time with the seals.

While I hiked with a 600mm lens and a specialized tripod, you may want to bring gear that weighs a lot less.  The hike to see the seals is about two miles and part of it is in sand dunes, so lightweight gear might be what you want to bring. On the flip side,  since the seals are protected, you wont be allowed to get very close for both your safety and for the safety of the seals. That means you may want to bring the longest lens you have.  So you have to make a decision on the weight of your equipment vs. how close you want to photograph your subjects.

The seals should only be part of your trip to Ano Neuvo State beach.  Since the tour only lasts a couple of hours you will have plenty of time to photograph other wildlife in the area as well as scenic coastal landscapes. Ano Neuvo is a 25 minute drive down from Half Moon Bay along highway 1 so there are all kinds of views to stop for.


Rain Birds

I always thought that most birds would go hunker down in a rainstorm, but I am clearly wrong about that. Last month I set up a bird feeder with perches built around it for them to land on.  These perches were precisely positioned for the best light on my subjects and for me to have my 600mm lens positioned to capture their comings and goings. It a lot of fun to watch, but even more fun to photograph.

Last week when we had our rainstorms, I thought  I would check to see if there was any activity at my backyard studio set up.  WOW!  These birds were still feeding!  Since they were working so hard, I thought I would get my equipment out and do some work as well.  Here is some of what I captured.


Prime Lenses vs Zoom Lenses

Over the years as a professional photographer, I have switched out most of my zoom lenses for prime lenses.  Prime, meaning fixed focal length lenses.  Where once I was attracted to the concept of staying in one place and zooming to get the focal length I wanted, now I just move around a bit more.


When you think about it, zoom lenses can keep you from moving forward or back.  But with a prime lens, if you want a different composition, you HAVE to move. Moving around on a set or outside in nature, you will see more angles, you will see other things that need photographing. Moving around is not a bad thing.

Faster

I have always thought prime lenses were a bit sharper than zoom lenses, but mostly I knew they were faster.

They are faster to focus.  With all of my lenses being of the auto-focus variety, I like the speed in which the prime lenses find and lock on a focus point. I don't have any high tech gizmos to check to see  just how fast a lens focuses, but when you are shooting a professional job, you don't want to wait for anything. The prime lens give you speed.

Brighter 

Prime lenses are also brighter, in that they let more light in and I can shoot in lower light conditions.

That is always the trade off, the lower the light, the more noise that get introduced or the lower the shutter speed. Some prime lenses are two stops brighter than their zoom counterparts. This means I can take the shot, hand held at a 50th of a second - where with the same zoom I would be looking for the tripod.  This increases my speed in shooting and my productivity.  Also, since they are brighter I can see better in lower light.  Most of my prime lenses are f/2.0 or faster. This gives me the freedom being able to see and compose in low light conditions.

This really pays off when I am trying to get absolute sharp focus on a subject and because its so dark, I can't rely on the auto focus anymore, I have to focus manually.

Better control of Depth of Field

With prime lenses that have a wide f/stop such as the Nikon 24mm 1.4 lens that I use, I can focus on the eye, but let the background go softly out of focus.  This kind of depth of field control is unheard of in a zoom lens.

Prime lenses can give you a new perspective on photography.  Take the challenge: dig through your camera case and find a prime lens, or borrow one. Try using it for a day of shooting and see what your work looks like, you may be surprised.

Photographer's Holiday Gift Buying Guide

Some of you are scrambling this time of year to get that photographer on your list something that is perfect for them but you don't want to spend too much, since it's their hobby, not yours. Here is a short list of suggestions that might fill that need or fill the stocking. These are not in any order but I tried to keep things down to a "gift" price point, most are under $25.

A Polarizing Filter

A Polarizing filter is just about the only filter every photographer should have in their bag.  They are fantastic for cutting glare on lakes and windows, enhancing the greens of leaves, cutting though haze and lowering the the density of an image to get more motion in a shot when there is too MUCH light.  You'll need to get the filter size of the lens they primarily use. That is stamped on the front edge of the lens.  If they have several lenses, get the largest filter size, they can rest on the edge of the lenses that it doesn't fit. As with anything optical, you can spend about $20 on up to $420 - this has to do with quality of glass and size.  Get them started with an inexpensive polarizer and let them see how it can improve their photography.


Bag for Digital Cards


I like the Pixel Pocket Rocket available at Think Tank  This company make fantastic products with tons of accessories. The Pixel Pocket Rocket is under $20 and holds up to 10 Compact Flash cards or you get a simular holder for SD cards.

Magazine Subscription

Get them a subscription to Outdoor Photographer magazine. Each month the magazine is loaded with tips and inspiration for nature and landscape shooters.

iphone App for the Sun Position


If they are a photographer and have an iPhone you have to get them the The Photographer's Ephemeris app.  This is a clever app that tells you where the sun is going to come up or where it's going to set.  The app uses Google Maps to pinpoint your location so they'll know which building the sun it going to come up over or which mountain top the sun will set behind.  I've used it, I love it!

Bushnell Backtrack

The Backtrack by Bushnell is a handy device that a photographer can use quite often.  Once they get to the perfect spot, a lot of times it not the best time of day and they want to come back at sunrise. With this device, you simply mark where are and head back.  The next morning, use the Backtrack to get right back where you were - even in the dark!  They can also use it to simply find their car in parking lot of a crowded mall, that day after Christmas.

Camera Wrap

Lets say you are one of those photographers that toss their camera in their purse for a quick trip.  The camera wrap can help protect that second lens or a camera body.  Tenba makes a good one that is simple to use but offers some good protection.  Works kind of like a diaper for your camera, wrap it up and you are ready to go!


Copyright 2015, Terry VanderHeiden